Gradio News: A Developer’s Guide to Building and Deploying Interactive Machine Learning Apps
Introduction: From Model to Interactive Demo in Minutes
In the rapidly evolving landscape of artificial intelligence, the gap between a trained machine learning model and a usable, interactive application often presents a significant hurdle. Developers and researchers spend weeks or months creating powerful models, only to face the complex task of building a web interface to showcase their work. This is where Gradio enters the picture, fundamentally changing the game. As a key topic in recent Gradio News, this open-source Python library empowers developers to create and share interactive web UIs for their ML models, APIs, or arbitrary Python functions with just a few lines of code.
The philosophy behind Gradio is simple: democratize access to machine learning. By eliminating the need for extensive web development knowledge (HTML, CSS, JavaScript), it allows AI practitioners to focus on what they do best—building models. Whether you’re working with the latest models from the Hugging Face News sphere, fine-tuning something with PyTorch or TensorFlow, or experimenting with generative AI from Stability AI News or OpenAI News, Gradio provides the fastest path to a tangible, shareable demo. This article serves as a comprehensive guide, taking you from the core concepts of Gradio to advanced techniques, practical examples, and deployment best practices, enabling you to transform your models into engaging web applications.
Section 1: The Core Concepts of Gradio: From Function to Interface
At its heart, Gradio is built around a simple and intuitive abstraction: mapping a Python function to an interactive user interface. This core concept is encapsulated in its primary class, gr.Interface. Understanding this class is the first step toward mastering Gradio.
The Three Pillars: Function, Inputs, and Outputs
A gr.Interface is defined by three main arguments:
fn: The Python function to wrap. This can be any callable Python object, from a simple lambda function to a complex method of a class that runs inference on a deep learning model.inputs: A component or a list of components that define the input fields of the UI. These components correspond to the arguments of your function. Examples includegr.Textbox(),gr.Image(), andgr.Slider().outputs: A component or a list of components that define the output fields. These components display the return value(s) of your function. Examples includegr.Textbox(),gr.Label(), andgr.Plot().
This elegant design pattern covers the vast majority of ML demo use cases. You provide a model’s prediction function, specify the type of input it expects (e.g., an image), and the type of output it produces (e.g., a dictionary of labels and confidences). Gradio handles the rest, spinning up a web server powered by FastAPI News and rendering a clean, responsive UI in the browser.
Your First Gradio App: “Hello, World!”
Let’s start with the simplest possible example to see these concepts in action. We’ll create a function that takes a name as input and returns a personalized greeting.
import gradio as gr

# 1. Define the core function
def greet(name):
    """
    A simple function that takes a name and returns a greeting string.
    """
    return f"Hello, {name}! Welcome to the world of Gradio."

# 2. Create the Gradio Interface
# - fn: The function to wrap.
# - inputs: A Textbox component for the 'name' argument.
# - outputs: A Textbox component to display the returned string.
demo = gr.Interface(
    fn=greet,
    inputs=gr.Textbox(label="Enter Your Name", placeholder="e.g., Ada Lovelace"),
    outputs=gr.Textbox(label="Greeting"),
    title="Simple Greeting App",
    description="This is a basic example to demonstrate the core concepts of Gradio."
)

# 3. Launch the web application
if __name__ == "__main__":
    demo.launch()
When you run this script, Gradio starts a local web server and provides a URL. Opening this URL in your browser reveals a fully functional web app with a text input box and a submit button. It’s a powerful demonstration of how quickly you can create an interactive experience, a concept that has made Gradio a popular alternative to more complex tools discussed in Streamlit News or Dash News.

Section 2: Building a Practical AI Application: Image Classification
While a greeting app is a great start, Gradio’s true power shines when applied to real machine learning models. Let’s build a more practical application: an image classifier. We will use a pre-trained model from the Hugging Face Hub, a central topic in Hugging Face Transformers News, to classify images uploaded by the user.
Setting Up the Model
First, we need to load a model. The transformers library makes this incredibly easy. We’ll use a pipeline for image classification, which handles all the preprocessing and post-processing steps for us. This workflow is common whether you’re following PyTorch News or TensorFlow News, as Hugging Face supports both backends.
import gradio as gr
from transformers import pipeline
import requests
from PIL import Image
# Load a pre-trained image classification pipeline from Hugging Face
# This uses a Vision Transformer (ViT) model fine-tuned on ImageNet.
classifier = pipeline("image-classification", model="google/vit-base-patch16-224")
def classify_image(input_image):
"""
This function takes a PIL Image, runs it through the classifier,
and formats the output for Gradio's Label component.
"""
# The pipeline returns a list of dictionaries.
# e.g., [{'score': 0.99, 'label': 'Egyptian cat'}, ...]
predictions = classifier(input_image)
# Format for gr.Label, which expects a dictionary of {label: confidence}
formatted_predictions = {p["label"]: p["score"] for p in predictions}
return formatted_predictions
# Define input and output components
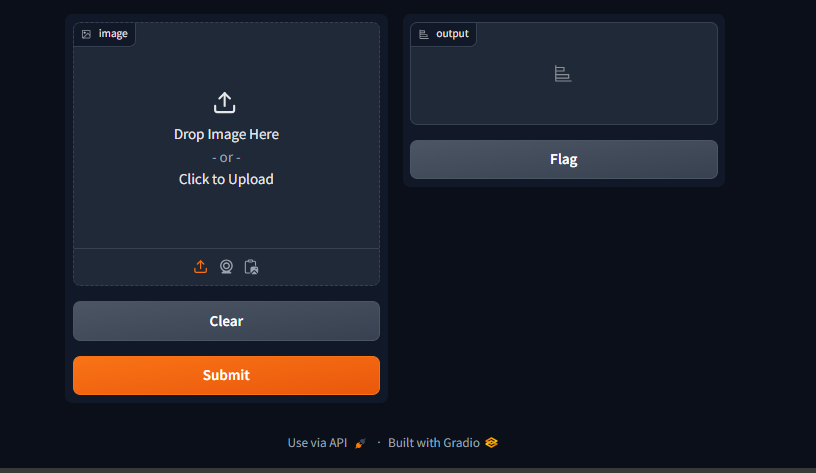
input_component = gr.Image(type="pil", label="Upload an Image")
output_component = gr.Label(num_top_classes=3, label="Top Predictions")
# Create the Gradio Interface
demo = gr.Interface(
fn=classify_image,
inputs=input_component,
outputs=output_component,
title="Image Classifier with Vision Transformer (ViT)",
description="Upload any image and the model will predict its class. This demo uses a model from the Hugging Face Hub.",
examples=[
["https://images.unsplash.com/photo-1573865526739-10659fec78a5?auto=format&fit=crop&w=600"], # Cat
["https://images.unsplash.com/photo-1547623542-de3ff5941ddB?auto=format&fit=crop&w=600"] # Dog
]
)
# Launch the app
if __name__ == "__main__":
demo.launch()This example showcases several key features. We use gr.Image(type="pil") to ensure the input to our function is a PIL Image object, which is what the Hugging Face pipeline expects. For the output, gr.Label is a specialized component perfect for classification tasks, automatically rendering a neat bar chart of class confidences. We also added an examples list, which provides users with one-click examples to test the application, a crucial feature for usability. This entire workflow, from model loading to a deployed demo, is a common practice discussed in news from major platforms like AWS SageMaker and Vertex AI.
Section 3: Advanced Gradio Features for Complex Applications
While gr.Interface is sufficient for many use cases, complex applications often require more control over the UI layout and interactivity. This is where gr.Blocks comes in, offering a more flexible, “building-block” approach to UI design.
Custom Layouts with `gr.Blocks`
gr.Blocks allows you to arrange components in any way you like using layouts like rows, columns, and tabs. You are no longer constrained to the simple “inputs on top, outputs on bottom” structure of gr.Interface. You define components and then link them together using event listeners.
Building a Stateful Chatbot
One of the most powerful features enabled by gr.Blocks is the ability to create stateful applications. A chatbot is a classic example where you need to maintain the conversation history between turns. Let’s build a simple “echo” chatbot that remembers what has been said.

This pattern is foundational for building interfaces for models discussed in OpenAI News, Anthropic News, or for open-source models highlighted in Mistral AI News. It’s also a core concept for developers using frameworks covered in LangChain News or LlamaIndex News.
import gradio as gr
import random
import time

# A simple "parrot" function that mimics a response
def parrot_response(message, history):
    # Append the user's message to the history
    history.append([message, None])

    # Simulate a "thinking" delay
    time.sleep(1)

    # Generate a simple bot response
    bot_message = f"You said: '{message}'. I am a simple parrot bot."

    # Update the last entry in history with the bot's response
    history[-1][1] = bot_message

    return "", history # Return an empty string to clear the textbox and the updated history

with gr.Blocks(theme=gr.themes.Soft()) as demo:
    gr.Markdown("# Stateful Parrot Chatbot")
    gr.Markdown("This chatbot remembers the conversation history using `gr.State`.")

    # The Chatbot component displays the conversation
    chatbot = gr.Chatbot(label="Conversation")

    # The State component stores the conversation history
    # It's not visible in the UI but persists across function calls
    chat_history = gr.State([])

    # The Textbox for user input
    msg_textbox = gr.Textbox(label="Your Message", placeholder="Type your message here and press Enter...")

    # The clear button
    clear_btn = gr.Button("Clear Conversation")

    # Define the event listener for submitting a message
    msg_textbox.submit(
        fn=parrot_response,
        inputs=[msg_textbox, chat_history],
        outputs=[msg_textbox, chatbot]
    )

    # Define the event listener for the clear button
    clear_btn.click(lambda: ([], []), inputs=None, outputs=[chatbot, chat_history])

if __name__ == "__main__":
    demo.launch()
In this advanced example, gr.State is the key component. It’s an invisible component that holds data—in this case, our list of conversation turns. It’s passed to our function as an input and returned as an output, allowing Gradio to manage and update the state between user interactions. We also use event listeners like .submit() and …click()` to define the application’s logic, creating a much more dynamic and responsive experience.
Section 4: Best Practices, Optimization, and Deployment
Creating a demo is one thing; making it robust, fast, and accessible is another. Here are some best practices for taking your Gradio applications to the next level.
Performance Optimization
When wrapping heavy models, especially those requiring significant GPU resources as often featured in NVIDIA AI News, performance is critical. Gradio provides two essential features to manage this:

- Queuing: By setting
demo.launch(enable_queue=True), you create a queue that processes user requests one by one. This prevents the app from crashing under concurrent requests and provides users with an estimate of their wait time. It’s essential for any public-facing demo. - Batching: For models that can process multiple inputs at once (common in transformers), you can enable batching. In your function, set
allow_batching=Truein thegr.Interfaceor event listener. Your function will then receive a list of inputs instead of a single one, allowing you to perform batched inference, which can dramatically increase throughput. This is a key optimization technique when using tools like TensorRT News or inference servers like Triton Inference Server News.
Sharing and Deployment
Gradio makes sharing your work incredibly simple.
- Temporary Sharing: Setting
demo.launch(share=True)generates a temporary, public URL for your app that tunnels to your local machine. It’s perfect for quickly sharing your work with colleagues or for a presentation. The link expires after 72 hours. - Permanent Deployment: For a permanent home, the most popular option is Hugging Face Spaces. With just a few clicks, you can deploy your Gradio app from a Git repository. Other options include self-hosting on a cloud provider (using Docker) or leveraging serverless ML platforms, a topic often covered in Modal News or Replicate News.
Enhancing User Experience
A good demo is not just functional; it’s also user-friendly. Use markdown components to provide clear instructions. Use the examples parameter to pre-populate your interface with interesting inputs. Implement clear error handling within your function to give users meaningful feedback if something goes wrong. These small touches can significantly improve the quality of your application and are a central focus of MLOps platforms discussed in MLflow News and Weights & Biases News.
Conclusion: The Future of Interactive AI
Gradio has firmly established itself as an essential tool in the modern AI developer’s toolkit. By abstracting away the complexities of web development, it allows creators to focus on innovation, rapidly moving from a theoretical model to a practical, interactive application. We’ve journeyed from the basic building blocks of gr.Interface to the flexible power of gr.Blocks, built a real-world image classifier, and constructed a stateful chatbot. We’ve also covered critical best practices for optimization and deployment that ensure your applications are robust and scalable.
The key takeaway is Gradio’s role as a catalyst for collaboration and accessibility. It empowers individual researchers to showcase their work, enables teams to build internal tools, and allows companies to create public-facing demos for their latest models. As the AI ecosystem continues to expand with news from Google DeepMind News to Meta AI News, tools like Gradio that bridge the final mile to the end-user will only become more critical. The next step is for you to take these concepts and apply them to your own projects. Pick a model, define a function, and launch your own interactive AI experience today.