
Building Production-Ready LLM Apps with Chainlit: A Developer’s Deep Dive
From Notebook to Web App: A Comprehensive Guide to Chainlit
The world of artificial intelligence is buzzing with constant innovation, fueled by breakthroughs from research labs like OpenAI, Google DeepMind, and Meta AI. While powerful Large Language Models (LLMs) are more accessible than ever, the journey from a promising script in a Jupyter notebook to a polished, user-friendly web application remains a significant hurdle for many developers. This is where the challenge of UI development, observability, and rapid iteration comes into play. Traditional web frameworks like Flask or FastAPI are powerful but often require extensive frontend work, slowing down the prototyping cycle. This is the gap that Chainlit aims to fill.
Chainlit is an open-source Python framework designed specifically for building conversational AI and LLM-powered applications. It enables developers to create a feature-rich, chat-based user interface in minutes, not days. Unlike more general-purpose UI libraries such as Streamlit or Gradio, Chainlit is purpose-built for the conversational paradigm. It offers out-of-the-box features for visualizing the reasoning process of LLM chains and agents, an essential component for debugging and building user trust. This article provides a comprehensive, technical guide to leveraging Chainlit to build, customize, and deploy sophisticated LLM applications, complete with practical code examples and best practices.
Understanding the Chainlit Philosophy: Core Concepts
Before diving into complex implementations, it’s crucial to grasp the core principles that make Chainlit an effective tool for LLM application development. Its design philosophy centers on speed, introspection, and seamless integration with the modern AI stack.
What is Chainlit?
At its heart, Chainlit is an abstraction layer that sits between your backend LLM logic (often orchestrated by frameworks like LangChain or LlamaIndex) and the end-user. It provides a clean, asynchronous API for sending messages, displaying elements, and handling user interactions. Its key features include:
- Fast UI Generation: Create a chat interface with just a few lines of Python code.
- Data Persistence: Automatically handles user sessions and chat history, enabling stateful conversations.
- Element Display: Supports rendering images, text, PDFs, and interactive elements like buttons and input fields.
- Observability: The “Chain of Thought” visualizer allows developers and users to see the intermediate steps an agent or chain takes to arrive at an answer. This is a game-changer for debugging complex prompts and RAG systems.
- Framework Agnostic: While it has first-class support for popular libraries, it can be used with any Python-based LLM logic.
Your First Chainlit Application
Let’s build a simple “hello world” application that connects to the OpenAI API. This example demonstrates the fundamental building blocks of any Chainlit app.
First, ensure you have the necessary libraries installed and your OpenAI API key is set as an environment variable (OPENAI_API_KEY).
pip install chainlit openaiNow, create a Python file named app.py:
import os
import chainlit as cl
from openai import AsyncOpenAI

# Initialize the OpenAI client
client = AsyncOpenAI(api_key=os.environ.get("OPENAI_API_KEY"))

@cl.on_chat_start
async def start_chat():
    """
    This function is called when a new chat session starts.
    It can be used to send a welcome message or initialize user session data.
    """
    await cl.Message(
        content="Hello! I am a simple chat assistant. How can I help you today?",
        author="Assistant"
    ).send()

@cl.on_message
async def main(message: cl.Message):
    """
    This function is called every time a user sends a message.
    """
    # Create the message history for the OpenAI API
    messages = [
        {"role": "system", "content": "You are a helpful assistant."},
        {"role": "user", "content": message.content}
    ]

    # Call the OpenAI API
    try:
        response = await client.chat.completions.create(
            model="gpt-3.5-turbo",
            messages=messages,
            temperature=0.7,
            stream=True
        )

        # Stream the response to the user
        msg = cl.Message(content="")
        await msg.send()

        final_content = ""
        async for chunk in response:
            if chunk.choices[0].delta.content:
                token = chunk.choices[0].delta.content
                await msg.stream_token(token)
                final_content += token

        msg.content = final_content
        await msg.update()

    except Exception as e:
        await cl.Message(content=f"An error occurred: {e}", author="Error").send()
To run this application, execute the following command in your terminal:
chainlit run app.py -wThe -w flag enables auto-reloading, which is incredibly useful during development. This simple example showcases the power of Chainlit’s decorators (@cl.on_chat_start, @cl.on_message) and its asynchronous nature, allowing for efficient, non-blocking operations like streaming responses from an LLM.
Integrating Chainlit with the Broader LLM Ecosystem
While a direct API call is great for simple bots, most real-world applications require more complex logic, such as interacting with external data sources. This is where frameworks like LangChain shine, and Chainlit’s native integrations make this process remarkably smooth.
Powering Your App with LangChain and Vector Databases
LangChain provides the tools to build sophisticated applications like Retrieval-Augmented Generation (RAG) systems. Chainlit’s `LangchainCallbackHandler` automatically intercepts calls within a LangChain chain and visualizes them in the UI. This provides unparalleled insight into how your RAG system is retrieving documents and generating responses.
Let’s build a simple RAG app that answers questions from a local text file. We’ll use ChromaDB for our vector store, a popular choice alongside other solutions like Pinecone, Milvus, and Weaviate.
import os
import chainlit as cl
from langchain_openai import ChatOpenAI, OpenAIEmbeddings
from langchain_community.vectorstores import Chroma
from langchain.chains import RetrievalQA
from langchain.prompts import PromptTemplate
from langchain_community.document_loaders import TextLoader

# Initialize components
llm = ChatOpenAI(model="gpt-3.5-turbo", temperature=0)
embeddings = OpenAIEmbeddings()

# Create a dummy text file for our knowledge base
with open("knowledge.txt", "w") as f:
    f.write("Chainlit is an open-source Python framework for building LLM applications.\n")
    f.write("It helps developers create UIs for conversational AI quickly.\n")
    f.write("Docker is a platform for developing, shipping, and running applications in containers.\n")

# Load documents and create a vector store
loader = TextLoader("knowledge.txt")
documents = loader.load()
vector_store = Chroma.from_documents(documents, embeddings)
retriever = vector_store.as_retriever()

# Create the RetrievalQA chain
prompt_template = """Use the following pieces of context to answer the question at the end. If you don't know the answer, just say that you don't know, don't try to make up an answer.

{context}

Question: {question}
Answer:"""
PROMPT = PromptTemplate(
    template=prompt_template, input_variables=["context", "question"]
)

chain = RetrievalQA.from_chain_type(
    llm=llm,
    chain_type="stuff",
    retriever=retriever,
    chain_type_kwargs={"prompt": PROMPT},
    return_source_documents=True,
)

@cl.on_chat_start
async def start():
    cl.user_session.set("chain", chain)
    await cl.Message(content="RAG system is ready. Ask me a question about Chainlit or Docker!").send()

@cl.on_message
async def main(message: cl.Message):
    chain = cl.user_session.get("chain")
    cb = cl.AsyncLangchainCallbackHandler(
        stream_final_answer=True, answer_prefix_tokens=["Answer", ":"]
    )
    cb.answer_reached = True

    res = await chain.acall(message.content, callbacks=[cb])
    answer = res["result"]
    source_documents = res["source_documents"]

    if source_documents:
        text_elements = []
        for source_doc in source_documents:
            text_elements.append(
                cl.Text(content=source_doc.page_content, name=source_doc.metadata['source'])
            )
        await cl.Message(content=answer, elements=text_elements).send()
    else:
        await cl.Message(content=answer).send()
When you run this app and ask a question, you will see the intermediate steps in the UI: the call to the retriever, the documents it found, and the final prompt sent to the LLM. This deep integration is a key reason many developers choose Chainlit for building complex agents, and it’s a feature that sets it apart from more generic dashboarding tools mentioned in *Streamlit News* or *Gradio News*.
Beyond Basic Chat: Advanced Chainlit Features
Chainlit’s capabilities extend far beyond simple question-and-answer bots. You can build rich, interactive experiences by leveraging its diverse set of UI elements and session management features.
Customizing the User Experience with UI Elements
You can control the entire user interaction flow. For instance, you can ask the user for input, present them with choices, or request a file upload. These elements are critical for building applications that require more than just text input.

This example demonstrates how to ask for the user’s name and then ask them to upload a file for processing.
import chainlit as cl

@cl.on_chat_start
async def start():
    # Ask for the user's name
    res = await cl.AskUserMessage(content="What is your name?", timeout=30).send()
    if res:
        name = res['content']
        cl.user_session.set("name", name)

        # Ask for a file upload
        files = None
        while files is None:
            files = await cl.AskFileMessage(
                content=f"Hello {name}! Please upload a text file to begin.",
                accept=["text/plain"],
                max_size_mb=5,
            ).send()

        # Process the file
        text_file = files[0]
        with open(text_file.path, "r", encoding="utf-8") as f:
            text_content = f.read()

        await cl.Message(
            content=f"I've received your file `{text_file.name}`. It contains {len(text_content)} characters."
        ).send()
This code illustrates a multi-step, stateful interaction. The `cl.user_session` object is a simple key-value store that persists data for the duration of a user’s session, making it easy to carry context across multiple messages. This is fundamental for building personalized and coherent conversational experiences.
From Development to Deployment: Best Practices
Building an application is only half the battle; deploying it reliably and securely is what makes it useful. Containerization with Docker is the industry standard for achieving reproducible and scalable deployments.
Containerizing with Docker
A Dockerfile provides a blueprint for creating an image of your application, including all its dependencies. This image can then be run consistently on any machine that has Docker installed, from your local laptop to a cloud server on AWS SageMaker or Azure Machine Learning.
First, create a `requirements.txt` file:
chainlit
openai
langchain
langchain-openai
langchain-community
chromadb
tiktoken
Next, create a `Dockerfile` in the same directory:
# Use an official Python runtime as a parent image
FROM python:3.11-slim

# Set the working directory in the container
WORKDIR /app

# Copy the requirements file into the container
COPY requirements.txt .

# Install any needed packages specified in requirements.txt
RUN pip install --no-cache-dir -r requirements.txt

# Copy the rest of the application code
COPY . .

# Make port 8000 available to the world outside this container
EXPOSE 8000

# Set environment variables
# IMPORTANT: In production, use a secrets management system
ENV CHAINLIT_HOST=0.0.0.0
ENV CHAINLIT_PORT=8000
# ENV OPENAI_API_KEY=your_key_here

# Run app.py when the container launches
# The --headless flag is important for running in a non-interactive environment
CMD ["chainlit", "run", "app.py", "--headless"]
With this setup, you can build and run your application with two simple commands:
docker build -t my-chainlit-app .
docker run -p 8000:8000 --env-file .env my-chainlit-app
This container can be deployed to a variety of platforms, including Hugging Face Spaces, or more scalable, serverless GPU providers like Modal, Replicate, and RunPod, which are becoming increasingly popular for hosting AI applications.
Optimization and Security Considerations
- API Key Management: Never hardcode API keys in your source code. Use environment variables or a dedicated secrets management service.
- Model Performance: For production applications with high traffic, consider using optimized inference servers like vLLM or NVIDIA’s Triton Inference Server to improve throughput and reduce latency.
- Monitoring: Integrate with tools like LangSmith for deeper tracing and evaluation of your LLM chains. This complements Chainlit’s UI-based observability with production-grade monitoring.
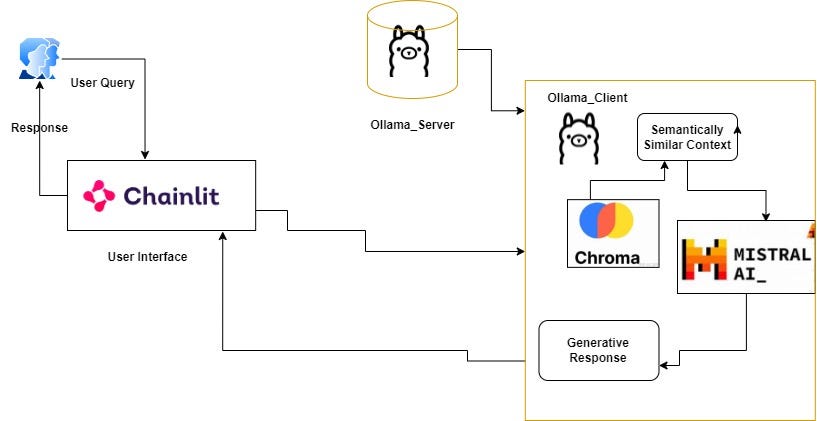
- Local Models: For privacy-sensitive applications or to reduce costs, explore running open-source models locally using tools like Ollama. This is a rapidly growing trend, with exciting developments in the *Mistral AI News* and *Meta AI News* cycles.
Conclusion: Your Next Steps with Chainlit
Chainlit has carved out a vital niche in the rapidly expanding AI development ecosystem. By focusing on the specific needs of conversational AI, it provides a developer experience that is both fast and insightful. Its tight integration with frameworks like LangChain, coupled with its powerful built-in observability features, drastically reduces the time it takes to go from an idea to a functional, debuggable application. We’ve journeyed from a basic chat interface to a containerized RAG system, demonstrating the framework’s versatility and power.
The field of AI is evolving at an incredible pace, with constant updates reflected in *PyTorch News* and *Hugging Face Transformers News*. Tools like Chainlit are essential for keeping up, allowing developers to focus on the core logic of their applications rather than getting bogged down in frontend development. Your next step is to take these concepts and apply them to your own projects. Explore the official documentation, experiment with different UI elements, and integrate the vast array of models and tools available today. The path from concept to creation has never been clearer.